For those who want to learn CSS in 3 days must read this carefully after reading this content you are yourself able to make your website very attractive..
CSS:-Cascading style sheet:-
css is backbone of html just beacuse of the attractive properties of the css. all the website developers used css to make the wesite attractive.only a website developer knows the power of css.
It is of three types.

1.Inline.
<p style="color:blue;margin-left:50px;">This is a paragraph.</p>
2.inside head
<head>
<style>
h2
{
align:center;
}
</style>
</head>
3.by calling css.
<head>
<link type "text/css"rel="stylesheet"href="mystyle.css"/>
</head>
</head>
Example:-
<!DOCTYPE html>
<html>
<head>
<style>
body
{
background-color:#d0e4fe;
}
h1
{
color:orange;
text-align:center;
}
p
{
font-family:"Times New Roman";
font-size:20px;
}
</style>
</head>
<body>
<h1>CSS example!</h1>
<p>This is entwicklers.</p>
</body>
</html>
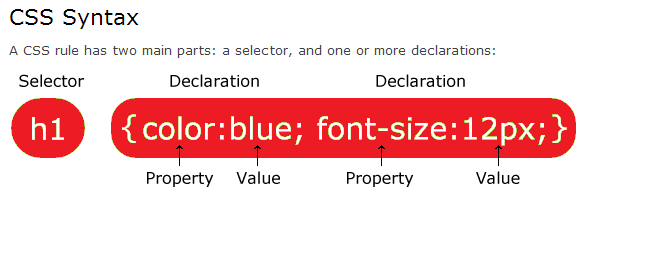
CSS syntax:-
Example of css:-
<!DOCTYPE html>
<html>
<head>
<style>
p
{
color:red;
text-align:center;
}
</style>
</head>
<body>
<p>Hello entwicklers!</p>
<p>we are the developers.</p>
</body>
</html>
CSS ID AND CLASS:-
The id and class Selectors
when you are setting a style for html, CSS allows you to specify your own selectors called "id" and "class".
The id Selector:-
The id selector is used to specify a style for a every single, unique element.
The id selector uses the id attribute of the HTML element, and is defined with a "#".
The style rule below will be applied to the element with id="para1":
Example:-
<!DOCTYPE html>
<html>
<head>
<style>
#para1
{
text-align:center;
color:red;
}
</style>
</head>
<body>
<p id="para1">Hello World!</p>
<p>we the entwicklers.</p>
</body>
</html>
The class Selector:-
The class selector is used to specify a style for a group of elements. Unlike the id selector, the class selector is most often used on several elements.
with the help of same class you can set a particular style for many HTML elements .
The class selector uses the HTML class attribute, and is defined with a "."
Example:-
<!DOCTYPE html>
<html>
<head>
<style>
.center
{
text-align:center;
}
</style>
</head>
<body>
<h1 class="center">Center-aligned heading</h1>
<p class="center">Center-aligned paragraph.</p>
</body>
</html>
CSS Background:-
The background-color property defines the background color of an element on which we are working.
The background color of a page is defined in the body selector:
Example:-
<!DOCTYPE html>
<html>
<head>
<style>
body
{
background-color:#b0c4de;
}
</style>
</head>
<body>
<h1>My CSS web page!</h1>
<p>Hello world! This is www.entwicklers.com</p>
</body>
</html>
Example 2:- if we are willing to give the background seprately so the code become like this.
<!DOCTYPE html>
<html>
<head>
<style>
h1
{
background-color:#6495ed;
}
p
{
background-color:#e0ffff;
}
div
{
background-color:#b0c4de;
}
</style>
</head>
<body>
<h1>CSS background-color example!</h1>
<div>
This is a text inside a div element.
<p>This paragraph has its own background color.</p>
We are still in the div element.
</div>
</body>
</html>
Background image:-
The background image property defines an image to use as the background of an element.
By default, the image is repeated so it covers the whole element.
Example:-
<!DOCTYPE html>
<html>
<head>
<style>
body {background-image:url('paper.gif');}
</style>
</head>
<body>
<h1>Hello entwicklers!</h1>
</body>
</html>
Background Image - Repeat Horizontally or Vertically:-
if you want to repeat your image then use this syntax for repeating it.
body
{
background-image:url('gradient2.png');
}
Example:-
<!DOCTYPE html>
<html>
<head>
<style>
body
{
background-image:url('gradient3.png');
}
</style>
</head>
<body>
<h1>Hello World!</h1>
</body>
</html>
Background Image - Set position and no-repeat:-
if in case you dn't want to repeat the image then use this syntax.
body
{
background-image:url('img_tree.png');
background-repeat:no-repeat;
}
Example:-
<!DOCTYPE html>
<html>
<head>
<style>
body
{
background-image:url('img_tree.png');
background-repeat:no-repeat;
}
</style>
</head>
<body>
<h1>Hello entwicklers!</h1>
<p>entwicklers background image example.</p>
<p>The background image is only showing once, but it is disturbing the reader!</p>
</body>
</html>
CSS TEXT:-
TEXT COLOR:-
The CSS TEXT color property is used to set the color of the text.
Some of the color properties are as follows:-
a HEX value - like "#ff0000"
an RGB value - like "rgb(255,0,0)"
a color name - like "red"
Look at CSS Color Values for a complete list of possible color values.
Example:-
<!DOCTYPE html>
<html>
<head>
<style>
body {color:blue;}
h1 {color:#00ff00;}
p.tx {color:rgb(0,0,255);}
</style>
</head>
<body>
<h1>This is heading 1</h1>
<p>This is an simple paragraph. Notice that this text is blue. The default text-color for a page is defined in the body selector.</p>
<p class="tx">This is a paragraph with class="tx". This text is blue.</p>
</body>
</html>
Text Alignment:-
The text-align property is used to set the horizontal alignment of a text.
Text can be centered, or aligned to the left or right, or we can justify.
When text-align is set to "justify", each line is stretched so that every line has equal width, and the left and right margins are straight (like in magazines and newspapers, many more articles have).
Syntax:-
h1 {text-align:center;}
p.date {text-align:right;}
p.main {text-align:justify;}
Example:-
!DOCTYPE html>
<html>
<head>
<style>
h1 {text-align:center;}
p.date {text-align:right;}
p.main {text-align:justify;}
</style>
</head>
<body>
<h1>CSS text-align Example</h1>
<p class="date">May, 2009</p>
<p class="main">Shiva gazed at the orange sky. The clouds hovering above Mansarovar had just parted to reveal the setting sun. The brilliant giver of life was calling it a day once again. Shiva had seen a few sunrises in his twenty-one years.'</p>
<p><b>Note:</b> Resize the browser window to see how the value "justify" works.</p>
</body>
Font members:-
The font member of a text is set with the font-member property.
The font member property should hold several font names as a "fallback" system. If the browser does not support the first font, it tries the next font.
Start with the font you want, and end with a generic family, to let the browser pick a similar font in the generic family, if no other fonts are available.
important: If the name of a font member is more than one word, it must be in quotation marks, like: "Times New Roman".
More than one font member is specified in a comma-separated list:
Example:-syntax
p{font-member:"Times New Roman", Times, serif;}
Font Style:-
The font-style property is mostly used to specify italic text.
This property has 3 values:
normal - The text is shown normally
italic - The text is shown in italics
oblique - The text is "leaning" (oblique is very similar to italic, but less supported)
Example:-syntax
p.normal {font-style:normal;}
p.italic {font-style:italic;}
p.oblique {font-style:oblique;}
Font Size:-
The font-size property sets the size of the text.
Being able to manage the text size is important in web design. However, you should not use font size adjustments to make paragraphs look like headings, or headings look like paragraphs.
Always use the proper HTML tags, like <h1> - <h6> for headings and <p> for paragraphs.
The font-size value can be an absolute, or relative size.
Absolute size:-
Sets the text to a specified size
Does not allow a user to change the text size in all browsers (bad for accessibility reasons)
Absolute size is useful when the physical size of the output is known
Relative size:
Sets the size relative to surrounding elements
Allows a user to change the text size in browsers
Set Font Size With Pixels
Setting the text size with pixels gives you full control over the text size:
Example:-syntax
h1 {font-size:40px;}
h2 {font-size:30px;}
p {font-size:14px;}
The text can be resized in all browsers using the zoom tool (however, this resizes the entire page, not just the text).
Set Font Size With Em
To avoid the resizing problem with older versions of Internet Explorer, many developers use em instead of pixels.
1em is equal to the current font size. The default text size in browsers is 16px. So, the default size of 1em is 16px.
The size can be calculated from pixels to em using this formula: pixels/16=em
Example:-syntax
h1 {font-size:2.5em;} /* 40px/16=2.5em */
h2 {font-size:1.875em;} /* 30px/16=1.875em */
p {font-size:0.875em;} /* 14px/16=0.875em */
In the example above, the text size in em is the same as the previous example in pixels. However, with the em size, it is possible to adjust the text size in all browsers.
Unfortunately, there is still a problem with older versions of IE. The text becomes larger than it should when made larger, and smaller than it should when made smaller.
Use a Combination of Percent and Em
The solution that works in all browsers, is to set a default font-size in percent for the <body> element:
Example:- syntax
body {font-size:100%;}
h1 {font-size:2.5em;}
h2 {font-size:1.875em;}
p {font-size:0.875em;}
</html>
CSS padding:-
The padding clears an area around the content of an element. The padding is affected by the background color of the element.
The top, right, bottom, and left padding can be changed independently using separate properties. A shorthand padding property can also be used, to change all paddings at once.
The padding property can have from one to four values.
padding:25px 50px 75px 100px;
top padding is 25px
right padding is 50px
bottom padding is 75px
left padding is 100px
padding:25px 50px 75px;
top padding is 25px
right and left paddings are 50px
bottom padding is 75px
padding:25px 50px;
top and bottom paddings are 25px
right and left paddings are 50px
padding:25px;
all four paddings are 25px
Padding - Individual sides
In CSS, it is possible to specify different padding for different sides:
Example:-syntax
padding-top:25px;
padding-bottom:25px;
padding-right:50px;
padding-left:50px;
Padding - Shorthand property:-
To shorten the code, it is possible to specify all the padding properties in one property. This is called a shorthand property.
The shorthand property for all the padding properties is "padding":
Example:-syntax
padding:25px 50px;
CSS margin:-
The margin property can have from one to four values.
margin:25px 50px 75px 100px;
top margin is 25px
right margin is 50px
bottom margin is 75px
left margin is 100px
margin:25px 50px 75px;
top margin is 25px
right and left margins are 50px
bottom margin is 75px
margin:25px 50px;
top and bottom margins are 25px
right and left margins are 50px
margin:25px;
all four margins are 25px
CSS:-Cascading style sheet:-
css is backbone of html just beacuse of the attractive properties of the css. all the website developers used css to make the wesite attractive.only a website developer knows the power of css.
It is of three types.
1.Inline.
<p style="color:blue;margin-left:50px;">This is a paragraph.</p>
2.inside head
<head>
<style>
h2
{
align:center;
}
</style>
</head>
3.by calling css.
<head>
<link type "text/css"rel="stylesheet"href="mystyle.css"/>
</head>
</head>
Example:-
<!DOCTYPE html>
<html>
<head>
<style>
body
{
background-color:#d0e4fe;
}
h1
{
color:orange;
text-align:center;
}
p
{
font-family:"Times New Roman";
font-size:20px;
}
</style>
</head>
<body>
<h1>CSS example!</h1>
<p>This is entwicklers.</p>
</body>
</html>
CSS syntax:-
Example of css:-
<!DOCTYPE html>
<html>
<head>
<style>
p
{
color:red;
text-align:center;
}
</style>
</head>
<body>
<p>Hello entwicklers!</p>
<p>we are the developers.</p>
</body>
</html>
CSS ID AND CLASS:-
The id and class Selectors
when you are setting a style for html, CSS allows you to specify your own selectors called "id" and "class".
The id Selector:-
The id selector is used to specify a style for a every single, unique element.
The id selector uses the id attribute of the HTML element, and is defined with a "#".
The style rule below will be applied to the element with id="para1":
Example:-
<!DOCTYPE html>
<html>
<head>
<style>
#para1
{
text-align:center;
color:red;
}
</style>
</head>
<body>
<p id="para1">Hello World!</p>
<p>we the entwicklers.</p>
</body>
</html>
The class Selector:-
The class selector is used to specify a style for a group of elements. Unlike the id selector, the class selector is most often used on several elements.
with the help of same class you can set a particular style for many HTML elements .
The class selector uses the HTML class attribute, and is defined with a "."
Example:-
<!DOCTYPE html>
<html>
<head>
<style>
.center
{
text-align:center;
}
</style>
</head>
<body>
<h1 class="center">Center-aligned heading</h1>
<p class="center">Center-aligned paragraph.</p>
</body>
</html>
CSS Background:-
The background-color property defines the background color of an element on which we are working.
The background color of a page is defined in the body selector:
Example:-
<!DOCTYPE html>
<html>
<head>
<style>
body
{
background-color:#b0c4de;
}
</style>
</head>
<body>
<h1>My CSS web page!</h1>
<p>Hello world! This is www.entwicklers.com</p>
</body>
</html>
Example 2:- if we are willing to give the background seprately so the code become like this.
<!DOCTYPE html>
<html>
<head>
<style>
h1
{
background-color:#6495ed;
}
p
{
background-color:#e0ffff;
}
div
{
background-color:#b0c4de;
}
</style>
</head>
<body>
<h1>CSS background-color example!</h1>
<div>
This is a text inside a div element.
<p>This paragraph has its own background color.</p>
We are still in the div element.
</div>
</body>
</html>
Background image:-
The background image property defines an image to use as the background of an element.
By default, the image is repeated so it covers the whole element.
Example:-
<!DOCTYPE html>
<html>
<head>
<style>
body {background-image:url('paper.gif');}
</style>
</head>
<body>
<h1>Hello entwicklers!</h1>
</body>
</html>
Background Image - Repeat Horizontally or Vertically:-
if you want to repeat your image then use this syntax for repeating it.
body
{
background-image:url('gradient2.png');
}
Example:-
<!DOCTYPE html>
<html>
<head>
<style>
body
{
background-image:url('gradient3.png');
}
</style>
</head>
<body>
<h1>Hello World!</h1>
</body>
</html>
Background Image - Set position and no-repeat:-
if in case you dn't want to repeat the image then use this syntax.
body
{
background-image:url('img_tree.png');
background-repeat:no-repeat;
}
Example:-
<!DOCTYPE html>
<html>
<head>
<style>
body
{
background-image:url('img_tree.png');
background-repeat:no-repeat;
}
</style>
</head>
<body>
<h1>Hello entwicklers!</h1>
<p>entwicklers background image example.</p>
<p>The background image is only showing once, but it is disturbing the reader!</p>
</body>
</html>
CSS TEXT:-
TEXT COLOR:-
The CSS TEXT color property is used to set the color of the text.
Some of the color properties are as follows:-
a HEX value - like "#ff0000"
an RGB value - like "rgb(255,0,0)"
a color name - like "red"
Look at CSS Color Values for a complete list of possible color values.
Example:-
<!DOCTYPE html>
<html>
<head>
<style>
body {color:blue;}
h1 {color:#00ff00;}
p.tx {color:rgb(0,0,255);}
</style>
</head>
<body>
<h1>This is heading 1</h1>
<p>This is an simple paragraph. Notice that this text is blue. The default text-color for a page is defined in the body selector.</p>
<p class="tx">This is a paragraph with class="tx". This text is blue.</p>
</body>
</html>
Text Alignment:-
The text-align property is used to set the horizontal alignment of a text.
Text can be centered, or aligned to the left or right, or we can justify.
When text-align is set to "justify", each line is stretched so that every line has equal width, and the left and right margins are straight (like in magazines and newspapers, many more articles have).
Syntax:-
h1 {text-align:center;}
p.date {text-align:right;}
p.main {text-align:justify;}
Example:-
!DOCTYPE html>
<html>
<head>
<style>
h1 {text-align:center;}
p.date {text-align:right;}
p.main {text-align:justify;}
</style>
</head>
<body>
<h1>CSS text-align Example</h1>
<p class="date">May, 2009</p>
<p class="main">Shiva gazed at the orange sky. The clouds hovering above Mansarovar had just parted to reveal the setting sun. The brilliant giver of life was calling it a day once again. Shiva had seen a few sunrises in his twenty-one years.'</p>
<p><b>Note:</b> Resize the browser window to see how the value "justify" works.</p>
</body>
Font members:-
The font member of a text is set with the font-member property.
The font member property should hold several font names as a "fallback" system. If the browser does not support the first font, it tries the next font.
Start with the font you want, and end with a generic family, to let the browser pick a similar font in the generic family, if no other fonts are available.
important: If the name of a font member is more than one word, it must be in quotation marks, like: "Times New Roman".
More than one font member is specified in a comma-separated list:
Example:-syntax
p{font-member:"Times New Roman", Times, serif;}
Font Style:-
The font-style property is mostly used to specify italic text.
This property has 3 values:
normal - The text is shown normally
italic - The text is shown in italics
oblique - The text is "leaning" (oblique is very similar to italic, but less supported)
Example:-syntax
p.normal {font-style:normal;}
p.italic {font-style:italic;}
p.oblique {font-style:oblique;}
Font Size:-
The font-size property sets the size of the text.
Being able to manage the text size is important in web design. However, you should not use font size adjustments to make paragraphs look like headings, or headings look like paragraphs.
Always use the proper HTML tags, like <h1> - <h6> for headings and <p> for paragraphs.
The font-size value can be an absolute, or relative size.
Absolute size:-
Sets the text to a specified size
Does not allow a user to change the text size in all browsers (bad for accessibility reasons)
Absolute size is useful when the physical size of the output is known
Relative size:
Sets the size relative to surrounding elements
Allows a user to change the text size in browsers
Set Font Size With Pixels
Setting the text size with pixels gives you full control over the text size:
Example:-syntax
h1 {font-size:40px;}
h2 {font-size:30px;}
p {font-size:14px;}
The text can be resized in all browsers using the zoom tool (however, this resizes the entire page, not just the text).
Set Font Size With Em
To avoid the resizing problem with older versions of Internet Explorer, many developers use em instead of pixels.
1em is equal to the current font size. The default text size in browsers is 16px. So, the default size of 1em is 16px.
The size can be calculated from pixels to em using this formula: pixels/16=em
Example:-syntax
h1 {font-size:2.5em;} /* 40px/16=2.5em */
h2 {font-size:1.875em;} /* 30px/16=1.875em */
p {font-size:0.875em;} /* 14px/16=0.875em */
In the example above, the text size in em is the same as the previous example in pixels. However, with the em size, it is possible to adjust the text size in all browsers.
Unfortunately, there is still a problem with older versions of IE. The text becomes larger than it should when made larger, and smaller than it should when made smaller.
Use a Combination of Percent and Em
The solution that works in all browsers, is to set a default font-size in percent for the <body> element:
Example:- syntax
body {font-size:100%;}
h1 {font-size:2.5em;}
h2 {font-size:1.875em;}
p {font-size:0.875em;}
</html>
CSS padding:-
The padding clears an area around the content of an element. The padding is affected by the background color of the element.
The top, right, bottom, and left padding can be changed independently using separate properties. A shorthand padding property can also be used, to change all paddings at once.
The padding property can have from one to four values.
padding:25px 50px 75px 100px;
top padding is 25px
right padding is 50px
bottom padding is 75px
left padding is 100px
padding:25px 50px 75px;
top padding is 25px
right and left paddings are 50px
bottom padding is 75px
padding:25px 50px;
top and bottom paddings are 25px
right and left paddings are 50px
padding:25px;
all four paddings are 25px
Padding - Individual sides
In CSS, it is possible to specify different padding for different sides:
Example:-syntax
padding-top:25px;
padding-bottom:25px;
padding-right:50px;
padding-left:50px;
Padding - Shorthand property:-
To shorten the code, it is possible to specify all the padding properties in one property. This is called a shorthand property.
The shorthand property for all the padding properties is "padding":
Example:-syntax
padding:25px 50px;
CSS margin:-
The margin property can have from one to four values.
margin:25px 50px 75px 100px;
top margin is 25px
right margin is 50px
bottom margin is 75px
left margin is 100px
margin:25px 50px 75px;
top margin is 25px
right and left margins are 50px
bottom margin is 75px
margin:25px 50px;
top and bottom margins are 25px
right and left margins are 50px
margin:25px;
all four margins are 25px
No comments:
Post a Comment